Android TV & STBs
  Interactive screens
  Digital Signage
  Information Kiosk
  Phones, Tablets, and Laptops
  Point Of Sale Devices: PoS/mPOS
  Rugged devices
  Custom devices
  Configuration Management
  Remote Support
  App Management
  Kiosk Mode
  Device Analytics
  Firmware Management
  Geo-fence and Anti-theft
  Customer Care


Overview
The Radix Mobile Device Manager has features to allow you to execute commands on devices remotely, according to a defined time schedule or according to a trigger. You can create a trigger for a device (by timing, geofencing, or by a Wi-Fi signal) from within the Device Dashboard. This lets you program the device’s reaction to the trigger, by selecting a particular command to be executed. You can set different events and set their thresholds and selectively apply different triggered events accordingly.
Accessing the Trigger Command
The Radix Device Manager has a variety of ways of accessing the Trigger command:
Method One: From the Repository Console
You can create a new trigger from the Repository Console. This will allow you to store the trigger for quick access when you want to apply it to a device in the future. However, you can only store the trigger in the Repository. You will have to use the other methods described here to apply the trigger to a device.
To create a new trigger from the Repository Console:
- Click on the Repositories icon in the Overview Dashboard. The Repository commands screen opens. Click on the Schedule & Trigger tile in the menu of Repository commands.
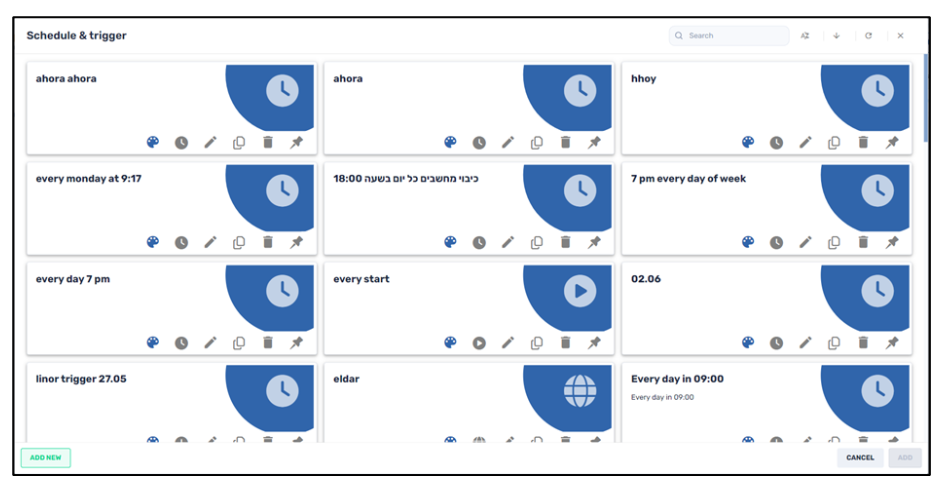
The Schedule & Trigger window opens.
- Click on Add New in the lower left corner of the Schedule & Trigger window. The New Schedule & Trigger Command window opens:

We’ll see below in the section Creating a Trigger how to create and store a new trigger.
Method Two: From the Device Dashboard
You can create and employ a trigger on a single device from the Device Dashboard, which opens when you click on the row of a particular device.
To access Schedule & Trigger from the Device Dashboard:
- Click on the Devices Console icon in the Overview Dashboard. You’ll get a list of all active devices.

- Search for the device you would like to apply a new trigger, using the search bar at the top of the page.

- Click on the line of the particular device to which you’d like to apply the trigger. The Device Dashboard opens.

- In the right-hand panel, click on Schedule & Trigger Command.

The Schedule & Trigger Command window opens.
- Supply a command name and click on Select Trigger. The Schedule & Trigger repository opens.

- Click Add New in the lower left-hand corner to open the New Scheduler and Trigger Window.

- Proceed from the section Creating a Trigger.
Method Three: From the Device’s Kebab Menu
You can create and employ a trigger on a single device from the device’s kebab menu (the icon with three vertical dots):
To access Schedule & Trigger from the device’s kebab menu:
- Click on the Devices Console icon in the Overview Dashboard, to get a list of all active devices.

- Search for the device you would like to apply a new trigger, using the search bar at the top of the page.
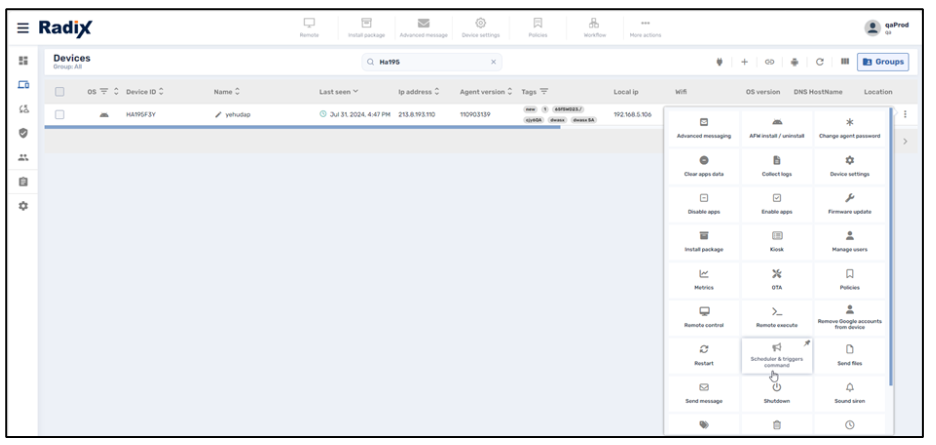
- After you find the desired device, click on the “kebab” (= three-dots) menu icon in the far-right column. A menu of commands will open.

- Select the Schedule & Triggers Command tile.

The Schedule & Trigger Command window opens.
- Supply a command name and click on Select Trigger. The Schedule & Trigger repository opens.

- Click Add New in the lower left-hand corner to open the New Scheduler and Trigger Window.

- Proceed from the section Creating a Trigger.
Method Four: From the Device Console Ribbon
If you wish to set and deploy a trigger on several devices, you can do it from the Devices Console Ribbon—the row of icons at the top of the Devices Console.
To activate a trigger on several devices:
- Click on the Devices Console icon in the Overview Dashboard. The Devices Console list opens up.

- From the list of devices, select the devices to which you want to apply the trigger by clicking on the checkbox on the far left of the device listing. The icons at the top of the page in the Device Console Ribbon will become active.

- Click on the More Actions icon and select the Schedule & Trigger Command.

- The Schedule & Trigger Command window opens.

- Supply a command name and click on Select Trigger. The Schedule & Trigger repository opens.

- Click Add New in the lower left-hand corner to open the New Scheduler and Trigger Window.

- Proceed from the section Creating a Trigger below.
Creating a Trigger
- When you get to the New Scheduler and Trigger window, supply the name and (optional) description to the trigger command.

- Click on the Add trigger icon.

You can select a trigger, as well as an optional command-line condition. You have 4 options to select as a trigger:
- Timing
- Geofencing
- WiFi
- Startup
- After you select the desired trigger and set its parameters, click Confirm. The new Schedule & Trigger that you have created will now appear in the repository of triggers.
We’ll go through each trigger option in detail.
Timing Trigger
This trigger allows you to execute a command at a particular date and time. The timing can be a one-time trigger, a trigger limited to a range of dates, or a perpetual trigger with no definite end date. You can have a trigger that executes a command every X number of days, or every day at a specific time, etc.
Timing Type–Once
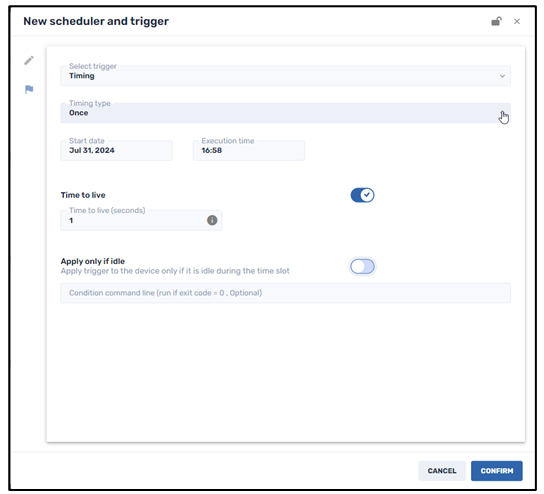
This option allows you to execute a command once, on a specific date and time.
There are two more optional commands that you can choose by clicking on the sliding button:
- Time to Live option In case the device is not accessible at the defined time, the Time to Live option is how long the command will be executed, after the assigned time. After that time, the trigger is irrelevant and no longer applies.
- Apply only if idle option When you select this option, the trigger will be applied only if the remote device is idle. This may be a consideration if the remote user is watching a video or listening to music and doesn’t want to be disturbed in the middle.
Timing Type–Forever
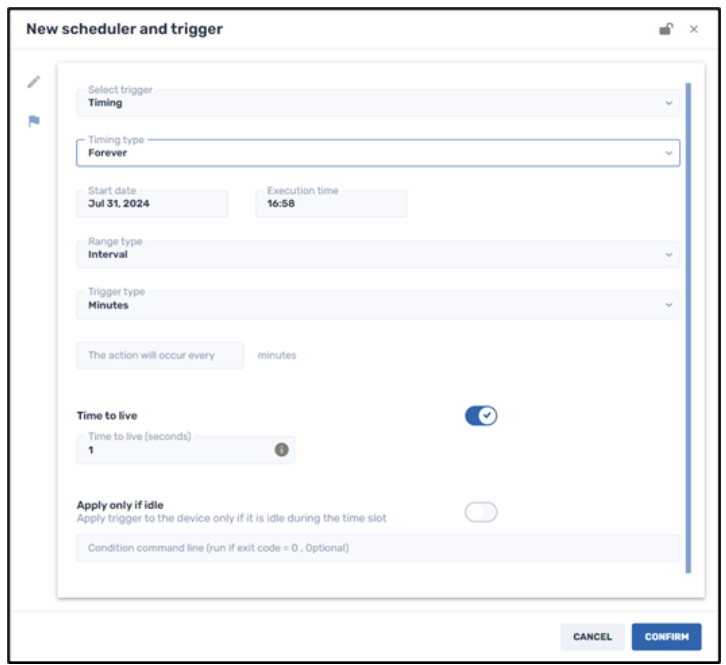
This option allows you to execute a command forever, at a specified interval, starting from an assigned date. There are three range options:
- Interval To execute a command at an assigned time interval: every X number of minutes, hours, days, or weeks. For example, the following trigger will execute a command every 4 days:

- Day of the week To execute a command on a particular day of the week, every week.
- Day of the month To execute a command on a particular date of every month.
Timing Type–From/To Date
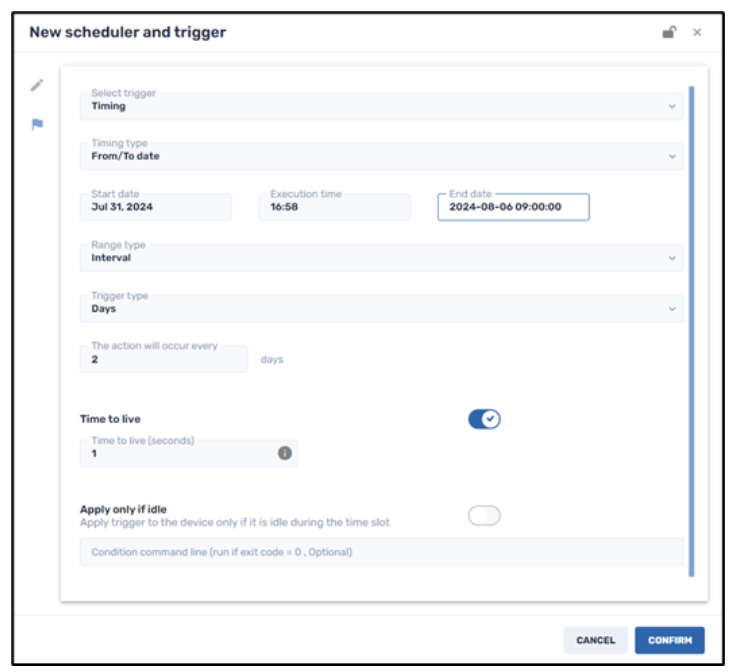
This option allows you to execute a command within a specific range of dates, at a specified time interval, starting from an assigned date. In the above example, the trigger will execute the command from July 31, 2024 to August 6, 2024, at an interval of once every 2 days.
Geofencing Trigger
This trigger allows you to execute a command within a certain geographic perimeter. You can draw the perimeter on a map and specify that the command should be executed if the device leaves that perimeter. (The minimum size for an area is a 20-meter radius.)
This feature can be useful if a device is lost or stolen. For example, you can use this feature to track a lost device and lock it down using the Lock Device command, or even wipe all personal data with the Wipe Device command.
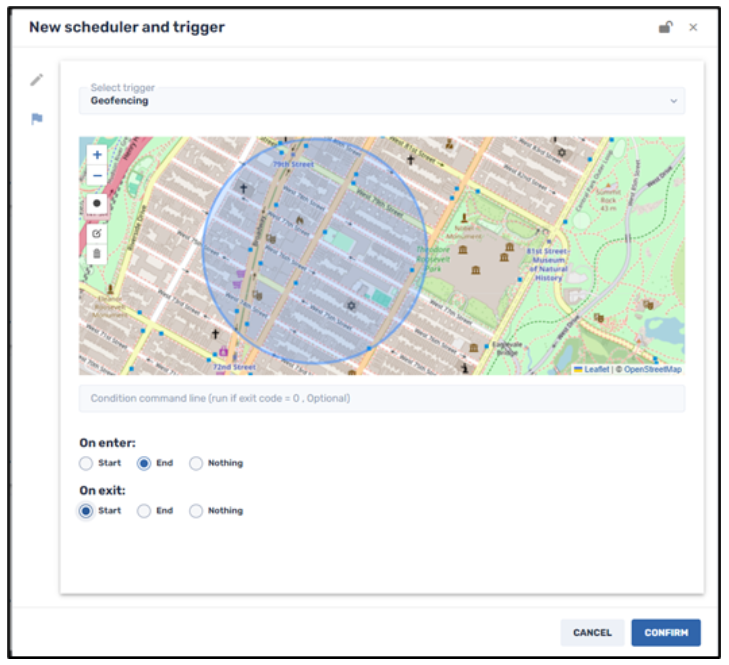
In the above example, a command will be triggered to start when you leave the perimeter of the circle on the map and will stop when you enter the circled area again.
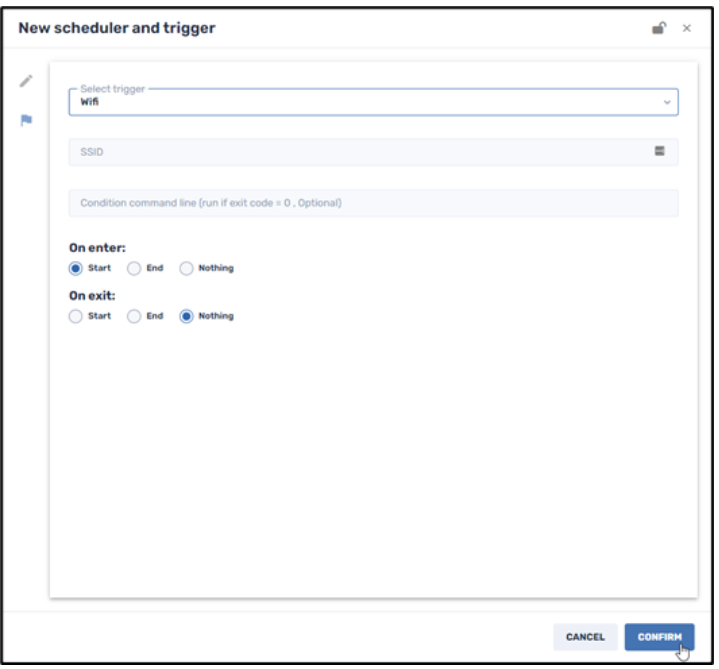
Wi-Fi Trigger
This allows you to execute a command to trigger an event upon receiving a Wi-Fi SSID connection trigger. This can also be used as a security precaution, to shut down or erase a device if it leaves a specific Wi-Fi SSID.
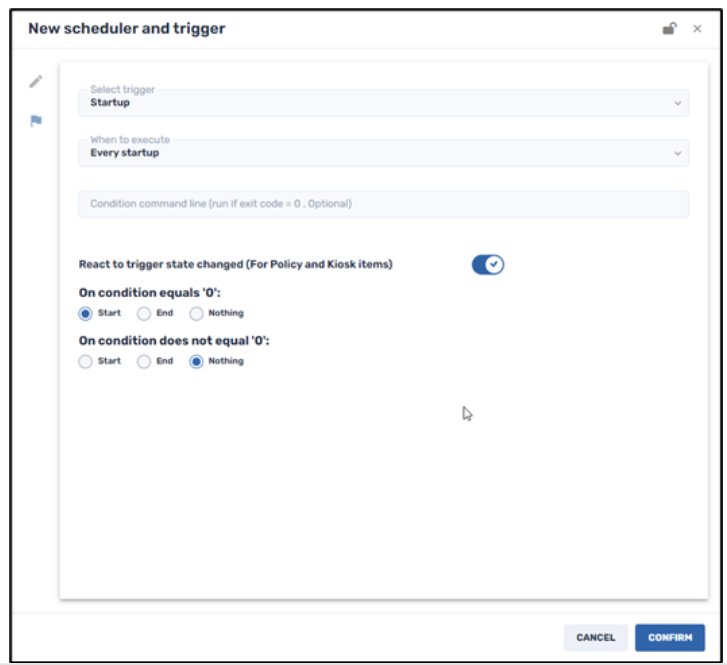
Startup Trigger
If you choose to employ the Startup Trigger, you can either execute a command 1) at every startup or 2) only the first time when a device is registered in the Radix Device Manager.
Creating Trigger-Based Commands
Now that we have a trigger, we will want to employ the trigger to execute a command. Linking the trigger to the command will differ slightly, depending on where we are in the Radix Device Manager. For our example, we will take the Send Message command, which is relatively uncomplicated.
To link a trigger to a command:
- Find the device to which you wish to send the command from the Devices Console.
- Click on the device’s kebab menu and select the Schedule & Trigger Command tile.
The Schedule & Trigger Command window opens.
- Supply a name for the trigger & command combination. In our example, we named it Tryout.
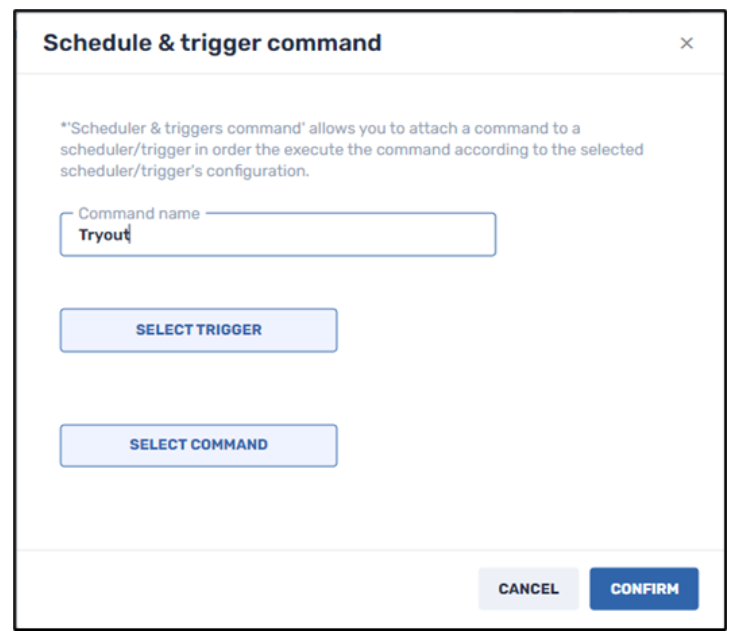
- Click on the Select Trigger button. The Schedule & Trigger window opens.
- Select the desired trigger, to set the command into action. For example, we’ll use YLP Timing. We have set it to trigger the command for a single day: July 31, 2024, at 17:50:

- Click Confirm. The trigger will be saved with the desired parameters.
- Click on the YLP Timing tile and click Add. It will be added to the Schedule and Trigger command.

- Click Select Command, and choose the tile Send Message.

- Fill in the fields in the Send Message command and click Confirm.

The Schedule and Trigger Command will appear as follows:
Upon clicking Confirm, you will receive confirmation that the Trigger and Command were sent properly to the device.