Android TV & STBs
  Interactive screens
  Digital Signage
  Information Kiosk
  Phones, Tablets, and Laptops
  Point Of Sale Devices: PoS/mPOS
  Rugged devices
  Custom devices
  Configuration Management
  Remote Support
  App Management
  Kiosk Mode
  Device Analytics
  Firmware Management
  Geo-fence and Anti-theft
  Customer Care


Overview
A workflow is a method of combining several actions and commands into a single bundle. Creating a workflow can save you time, by allowing you to perform multiple commands on many devices in a single task, instead of applying each command one-by-one.
Note! This method can also be applied to a newly enrolled device for quick “onboarding”. We’ll see that you can apply a workflow to a group of devices in such a way that any new device added to the group will immediately have the workflow applied to it as well.
Accessing the Workflow Command
There are several methods to access the Workflow command:
- From the Device Dashboard, from the Repositories screen,
- From a device’s kebab menu,
- From the Device Dashboard for a particular device,
- From the Device Console Ribbon at the top of the screen.
Method One: From the Repositories Screen
To access Workflows from the Repositories Console:
- Click the Repositories icon on the left side main menu in the Overview Dashboard. A drop-down menu of repository commands will open.

- From the drop-down menu, select Workflow.

A new window will open, showing all existing workflows. From the drop-down menu, select Workflow.
- Select a workflow item from the list. If you wish to create a new workflow, refer to the section Creating a New Workflow Item below.
Method Two: From the Device’s Kebab Menu
To access Workflows from the device’s kebab menu:
- On the left side main menu in the Overview Dashboard, click the Devices icon.

The Devices Console opens, with a list of available devices.
- Select the device to which you wish to apply the Workflow and click on the device’s kebab menu in the far-right column.

A grid of available commands opens, with the commands listed alphabetically.
- Select the Workflow command. The Workflow window opens, displaying all stored workflow items.

- Select a workflow item from the list. If you wish to create a new workflow, refer to the section Creating a New Workflow Item below.
Method Three: From the Device Dashboard
To access Workflows from the device’s Device Dashboard:
- On the left side main menu in the Overview Dashboard, click the Devices icon.
The Devices Console opens, with a list of available devices. - Select the device to which you wish to apply the Workflow and click on the row of that device in the Device Console.

The device’s Device Dashboard opens:
- In the right-hand section, click on the Repositories Actions tab.

- In the drop-down list, click on the Workflow option.

The Workflow window will open. - Select a workflow item from the list. If you wish to create a new workflow, refer to the section Creating a New Workflow Item below.
Method Four: From the Device Console Ribbon
To access Workflows from the Device Console Ribbon:
- On the left side main menu in the Overview Dashboard, click the Devices icon.
The Devices Console opens, with a list of available devices. - Select the device to which you wish to apply the Workflow by clicking on the checkbox in the far-left column of that device:

Note that the icons at the top of the page (the Device Console Ribbon) become active. - Click on the Workflow icon in the Device Console Ribbon.

The Workflow window will open. - Select a workflow item from the list. If you wish to create a new workflow, refer to the section Creating a New Workflow Item below.
Creating a New Workflow Item
- Click the Add New button in the lower-left corner of the Workflow window to add a new workflow.

- Supply a name and description for the workflow. In the Workflow Description field, write the different actions and steps that the workflow will contain.
- If you wish to keep the workflow item private, click on the Set as Private slider button. When you activate this option, only you will be able to see this Workflow in the Workflow window.
- If you wish to prevent other users from modifying the workflow, click on the Set as read-only button. The lock icon in the upper right corner will appear in a “locked” position.

- Click on the Commands icon to open the Commands window.
- Click on Add Command and select an action from the list.

In the example above, we selected the “Install Package” repository. This will display all of the existing software packages on the repository. You may select an existing package, or add a new package, as explained here.
- For our example, let’s select the GeoGebra Graphing Calculator. Click on the GeoGebra tile and click Add in the lower right-hand corner. The package will now appear in the New Workflow list.

- You may add several software packages, or other commands, using the Add Command In our example, we also included the Shazam music identification app and the Adobe Reader app.

- If you wish to change the order of the items, you can drag them by clicking on the Press to drag icon in the command. If you insert an alert in the middle of the workflow, this will inform you that the installation has proceeded as planned.

- When you have completed adding all the commands to the Workflow, click Confirm. The new Workflow will appear in the Workflow display of all saved workflows.

Editing an Existing Workflow
- If you wish to add or remove items from the Workflow, click the tile’s Edit icon.

- The Edit Workflow window appears allowing you to edit the name, description, and commands involved in the Workflow.

Options for Running the Workflow
Note the checkboxes in each of the commands in a Workflow:
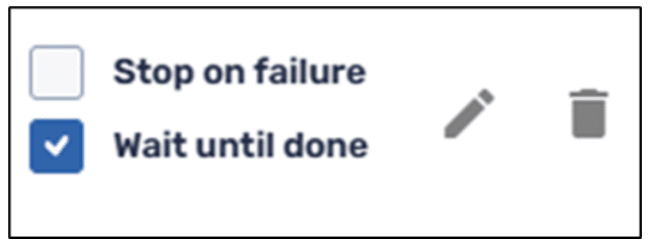
Here is an explanation of their function:
- Stop on failure This will stop the workflow from proceeding to the next step if one of the commands fails to execute.
- Wait until done This will force the workflow to wait for this step to finish, before proceeding to the next step in the Workflow. But the next steps will be executed whether this step fails or succeeds. If you choose not to check this checkbox, then the devices can execute the other steps simultaneously if the queue is not busy and the device can successfully execute the commands.
- Edit the step Clicking on the Edit icon allows you to edit the command.
- Delete the step Clicking on the Delete icon allows you to delete the command from the workflow.
Executing a Workflow Item
When you create a workflow item in the Repository Console, the workflow item is stored in the Repository for future reference. However, you will not be able to execute the workflow from the Repository Console on a device. If you wish to apply the workflow to a device, or several devices, there are two methods to do this.
Applying a Workflow Item to a Single Device
To apply a workflow item to a single device:
- Access the Workflow repository from Methods 2, 3, or 4 above (from the device’s kebab menu, from the Dashboard, or from the Device Console Ribbon).
- Find the workflow that you wish to apply to your device, click on it to select it, and click Apply.

You will receive an alert in the lower right-hand corner that the Workflow was sent to the device successfully.
Applying a Workflow to Several Devices
Instead of applying a workflow to each device individually, there is also a method to apply a workflow to several devices simultaneously.
To apply a workflow to several selected devices:
- Click on the Devices Console icon in the Overview Dashboard.

- In the list of devices, click on the checkboxes on the far left of the listing of that particular device.

- The icons at the top of the screen (the Device Console Ribbon) will become active. In the example above, we selected the two Android devices appearing in the list.
- Click on the Workflow icon at the top of the page, in the Devices Console Ribbon.

The Workflow window opens. - Find the desired workflow, select it by clicking on it, and click Apply.

You will receive a confirmation that the workflow was sent to the selected devices.
- A notification will appear in the lower left corner, displaying if the workflow was successfully applied to the selected devices. For example, in the following example, the workflow was sent to one device successfully, while it is pending for the other device.