Android TV & STBs
  Interactive screens
  Digital Signage
  Information Kiosk
  Phones, Tablets, and Laptops
  Point Of Sale Devices: PoS/mPOS
  Rugged devices
  Custom devices
  Configuration Management
  Remote Support
  App Management
  Kiosk Mode
  Device Analytics
  Firmware Management
  Geo-fence and Anti-theft
  Customer Care


Overview
Suppose you manage hundreds or thousands of Android devices. In that case, you must have encountered a situation where you must manually configure an app or a system setting with no remote APIs. We’ll show you a few tips on imitating an input event, such as swipe, touch, key input, menu opening, and more. Once you get the hang of it, there’s no limit to what you can do remotely. Instead of using the Remote Screen Control command, which only allows you to perform one command at a time, Remote Execute allows you to simultaneously automate the process to hundreds and thousands of devices.
There are two main ways of using Remote Execute:
- Create a shell script, send it to the fleet of devices using the file bundle, and execute it using the Remote Execute commands (in one Workflow command)
- Using individual Remote Execute commands, without combining them in a Workflow command.
For the sake of simplicity, we will use the Remote Execute command and show how to combine them in a Workflow command.
Accessing the Remote Execute Command
Once you open the Radix Device Manager, there are several methods to access the Remote Execute command:
- In the Device Dashboard, click Repositories>Remote Execute.

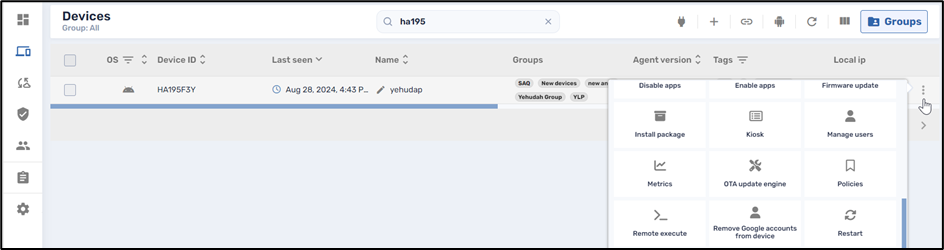
- From a device’s kebab menu, click Devices>Select a device>Click on the device’s three-dot menu>Select Remote Execute.
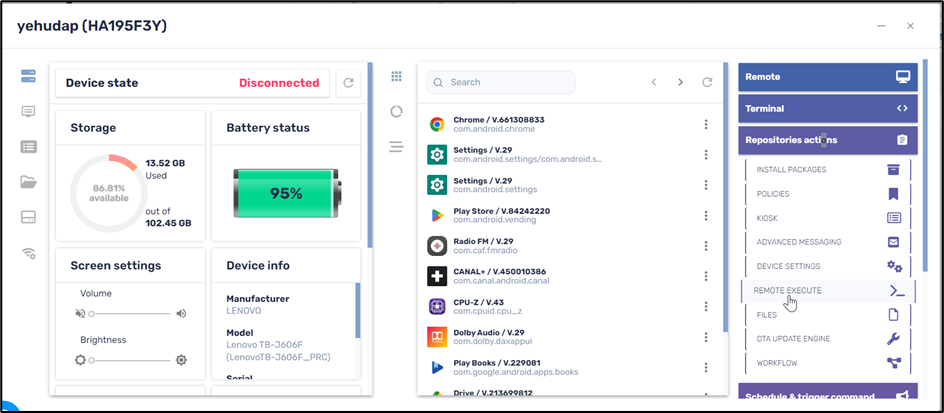
- From a device’s Device Dashboard: Click Devices>Select a device>Click on the row of the that device to open the Device Dashboard>Select Repositories actions>Select Remote Execute.
- From the Device Console Ribbon: Click Devices>Select a device>Click the device’s checkbox in the far-left column>Click More Actions in the ribbon at the top of the page>Select Remote Execute in the drop-down menu.

Each of these options opens the Remote Execute repository window:
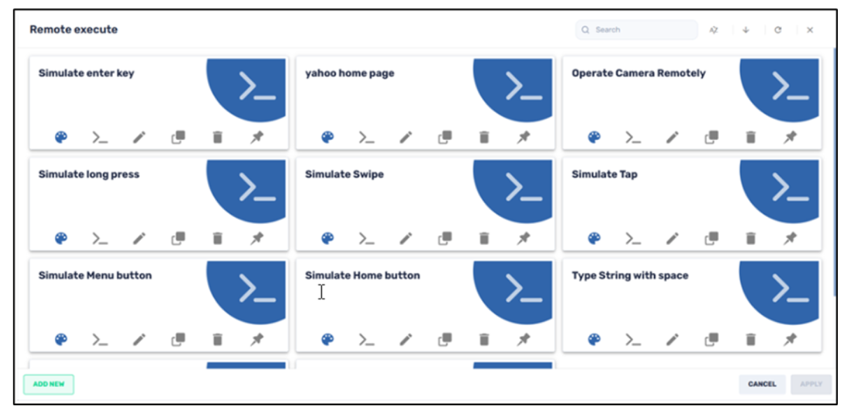
Select a command from the Remote Execute window.
Creating a New Command
- If you would like to create a script, click Add New in the Remote Execute window.

- In the New Remote Execution window, assign a name to your new script.

- Click Confirm. This saves the Remote Command in the repository of commands. You can refer back to the command by opening the Remote Execute repository.
Note! You will need high local device privileges in order to run the commands. Please use the Remote Execute option only if you are familiar with writing batches and scripts and know what you are doing!
Filling out the Remote Execute Parameters
To create a script, you will have to provide the following parameters:
– Command: This is where you write the main command.
– Arguments: This is where you write the command arguments.
You will have to select what type of code snippet you are creating:
– Command line: This is if you need to execute a command consisting of a single line.
– Script: This is if you want to execute a script of several lines.
There are other options regarding the execution of your code snippet:
– Wait for Exit: This will indicate if the command result should be sent after the command finishes, to run on the remote device.
– Collect output: This will indicate if the process standard result output is collected back as part of the command result.
– Run with high privileges: Run the command with higher local device privileges.
There are also options for displaying the remote execute command in the repository of commands:
– Set as private: Clicking on this sliding button will make the command private so that it is visible only to you.
– Set as read-only: Clicking on this sliding button will allow you to limit who will be able to edit the details of the Remote Execute command. When you click on Set as read-only, you will see the lock icon at the top of the screen turn to a “locked” position.

Here are a few sample remote command-line commands that you can send to a device.
Input Event Examples
Here are a few sample remote command-line commands that you can send to a device.
Command:
- Input
Arguments:
- Text—To type text in the device’s browser address bar
- Keyevent—To execute a command from the list of keyevents
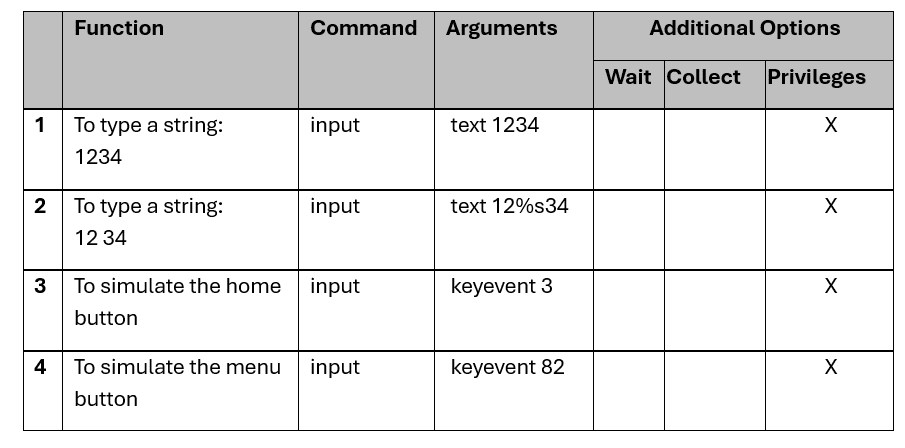
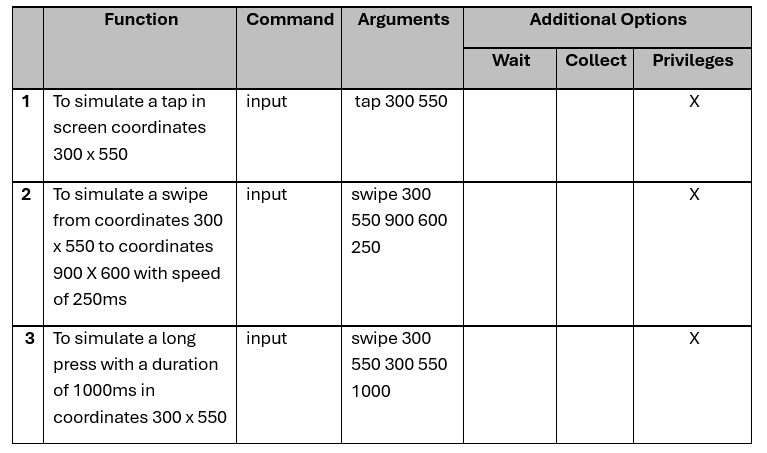
Touch Event Examples
Command:
- Input
Arguments:
- tap
- swipe
Keyevent list
Here is a reference guide to all of the keyevent options:
0 –> “KEYCODE_UNKNOWN”
1 –> “KEYCODE_MENU”
2 –> “KEYCODE_SOFT_RIGHT”
3 –> “KEYCODE_HOME”
4 –> “KEYCODE_BACK”
5 –> “KEYCODE_CALL”
6 –> “KEYCODE_ENDCALL”
7 –> “KEYCODE_0”
8 –> “KEYCODE_1”
9 –> “KEYCODE_2”
10 –> “KEYCODE_3”
11 –> “KEYCODE_4”
12 –> “KEYCODE_5”
13 –> “KEYCODE_6”
14 –> “KEYCODE_7”
15 –> “KEYCODE_8”
16 –> “KEYCODE_9”
17 –> “KEYCODE_STAR”
18 –> “KEYCODE_POUND”
19 –> “KEYCODE_DPAD_UP”
20 –> “KEYCODE_DPAD_DOWN”
21 –> “KEYCODE_DPAD_LEFT”
22 –> “KEYCODE_DPAD_RIGHT”
23 –> “KEYCODE_DPAD_CENTER”
24 –> “KEYCODE_VOLUME_UP”
25 –> “KEYCODE_VOLUME_DOWN”
26 –> “KEYCODE_POWER”
27 –> “KEYCODE_CAMERA”
28 –> “KEYCODE_CLEAR”
29 –> “KEYCODE_A”
30 –> “KEYCODE_B”
31 –> “KEYCODE_C”
32 –> “KEYCODE_D”
33 –> “KEYCODE_E”
34 –> “KEYCODE_F”
35 –> “KEYCODE_G”
36 –> “KEYCODE_H”
37 –> “KEYCODE_I”
38 –> “KEYCODE_J”
39 –> “KEYCODE_K”
40 –> “KEYCODE_L”
41 –> “KEYCODE_M”
42 –> “KEYCODE_N”
43 –> “KEYCODE_O”
44 –> “KEYCODE_P”
45 –> “KEYCODE_Q”
46 –> “KEYCODE_R”
47 –> “KEYCODE_S”
48 –> “KEYCODE_T”
49 –> “KEYCODE_U”
50 –> “KEYCODE_V”
51 –> “KEYCODE_W”
52 –> “KEYCODE_X”
53 –> “KEYCODE_Y”
54 –> “KEYCODE_Z”
55 –> “KEYCODE_COMMA”
56 –> “KEYCODE_PERIOD”
57 –> “KEYCODE_ALT_LEFT”
58 –> “KEYCODE_ALT_RIGHT”
59 –> “KEYCODE_SHIFT_LEFT”
60 –> “KEYCODE_SHIFT_RIGHT”
61 –> “KEYCODE_TAB”
62 –> “KEYCODE_SPACE”
63 –> “KEYCODE_SYM”
64 –> “KEYCODE_EXPLORER”
65 –> “KEYCODE_ENVELOPE”
66 –> “KEYCODE_ENTER”
67 –> “KEYCODE_DEL”
68 –> “KEYCODE_GRAVE”
69 –> “KEYCODE_MINUS”
70 –> “KEYCODE_EQUALS”
71 –> “KEYCODE_LEFT_BRACKET”
72 –> “KEYCODE_RIGHT_BRACKET”
73 –> “KEYCODE_BACKSLASH”
74 –> “KEYCODE_SEMICOLON”
75 –> “KEYCODE_APOSTROPHE”
76 –> “KEYCODE_SLASH”
77 –> “KEYCODE_AT”
78 –> “KEYCODE_NUM”
79 –> “KEYCODE_HEADSETHOOK”
80 –> “KEYCODE_FOCUS”
81 –> “KEYCODE_PLUS”
82 –> “KEYCODE_MENU”
83 –> “KEYCODE_NOTIFICATION”
84 –> “KEYCODE_SEARCH”
85 –> “TAG_LAST_KEYCODE”